Masso Dasuki

I am a Writer

Masso Dasuki

Love to consult on branding awareness, niche market and product value. Love to help people with non-programming skill to create Mobile Application using Android Studio. Experienced with Unity 3D, Laravel, Raspberry Pi, Adruino, Wordpress and Blogspot.

  • Bukit Antarabangasa, Ampang Selangor.
  • +6019-3213193
  • masso.unifreelancer@gmail.com

  • www.unifreelancer.blogspot.com

Me

My Professional Skills

Lorem ipsum dolor sit amet, consectetuer adipiscing elit, sed diam nonummy nibh euismod tincidunt ut laoreet dolore magna aliquam erat volutpat.

Web Design 90%
Web Development 70%
App Development 95%
Wordpress 60%

Awesome features

Aliquam commodo arcu vel ante volutpat tempus. Praesent pulvinar velit at posuere mollis. Quisque libero sapien.

Animated elements

Lorem ipsum dolor sit amet, consectetur adipiscing elit. Sed tempus cursus lectus vel pellentesque. Etiam tincidunt.

Responsive Design

Pellentesque ultricies ligula a libero porta, ut venenatis orci molestie. Vivamus vitae aliquet tellus, sed mollis libero.

Modern design

Duis ut ultricies nisi. Nulla risus odio, dictum vitae purus malesuada, cursus convallis justo. Sed a mi massa dolor.

Retina ready

Vivamus quis tempor purus, a eleifend purus. Ut sodales vel tellus vel vulputate. Fusce rhoncus semper magna.

Fast support

Suspendisse convallis sem eu ligula porta gravida. Suspendisse potenti. Lorem ipsum dolor sit amet, duis omis unde elit.

0
completed project
0
design award
0
facebook like
0
current projects
  • HandlerService.EventHandlerNotRegisteredException - Coldbox ColdFusion

    HandlerService.EventHandlerNotRegisteredException - Coldbox ColdFusion

    This problem happen as I copy and paste other source code from other developer .


    In Coldbox, we need to initialize as we insert something new . Hence go to the home page :


    Click on Execute .

    After you click on the execute the page can be open .


  • ColdBox - The parameter entityName to function is required but was not passed in.

    ColdBox - The parameter entityName to function is required but was not passed in.

    I am not really sure this problem, but it seem problem with entity .  Because we are using ORM to interact with database we need to create orm-entity using CommandBox .

    coldbox create orm-entity entityName=User primaryKey=id, properties=name,email,password --activeEntity


    --activeEntity is most important to write because it will activate the entity ..


    Make sure you don't have any space while write for properties. He will get dizzy if you put space like this properties=name, email, <space> password  <-- this is wrong .


  • Create Model using CommandBox in ColdBox Framework

    Create Model using CommandBox in ColdBox Framework


    coldbox create model name=Users --open

    Create the name="???" same as the database name . 
  • Enable ORM ColdFusion Coldbox Framework

    Enable ORM ColdFusion Coldbox Framework


    Above is coding that need to be add in Appliction.cfc to enable the application to interact using ORM .
  • Setup Datasource in ColdBox + Lucee !

    Setup Datasource in ColdBox + Lucee !


    Open Lucee in ColdBox

    After we right click on ColdBox icon, there will be a pop-up show few menus . Choose "Open Server Admin".


    A browser will open the browser directing to the Lucee Server Admin. For the first time user, you need to put your password.


    Create new datasource 


    For example
    Then click create !


    Datasource configuration .
    Make sure your put valid Host/Server , Database( inside MySql), Username and Password . Then your database name must already inside the MySQL. We are not creating new database but actually directing to MySql database. 


    Verify your datasource 

    Lastly, verify your datasource . After you choose datasource name .. click verify . 


  • How to create controller and action in command box ColdBox

    How to create controller and action in command box ColdBox


    coldbox create hello echo,index .
  • Coldbox For Cold Fusion

    Coldbox For Cold Fusion


    Coldbox is another way of MVC for Cold Fusion . This is framework can be alternative for CFWheels .


    Visit the web site https://www.coldbox.org/
    This the guide http://coldbox.ortusbooks.com/content/getting_started_guide/index.html

    Get the Malay guide book here :
    https://azman1204.gitbooks.io/coldbox-volume-1/content/


  • ColdFusion Calendar

    ColdFusion Calendar

    I found difficulty to get datepicker for Cold Fusion, but then I found this site iknowkungfoo .
    This form give me hope to get my form with date picker like his

    Then to get those thing I need to extract all jquery and css from that site .
    So this is the source code :

    Form View
    Calendar part 1 of 3
    Calendar part 2 of 3
    Calendar part 3 of 3


  • Database Connection Yii2

    Database Connection Yii2

    For Yii2 basic template the database connection can be found at config\db.php


    .
    For Yii2 advanced the database connection can be found at common\config\main-local.php


  • DatePicker in the Filter Field Gridview - Yii2 Framework

    DatePicker in the Filter Field Gridview - Yii2 Framework


    Step 1: Open shell XAMPP for Window 


    Insert in cmd
    composer require 2amigos/yii2-date-picker-widget:~1.0
    After install we can use in our form


    Open this link https://github.com/2amigos/yii2-date-picker-widget and see at the usage .

    Furthermore there is another of the widget 


  • Automatic Assign Current Date and Time after Create [ Yii2 Framework]

    Automatic Assign Current Date and Time after Create [ Yii2 Framework]

    Yii2 Framework CRUD


    In this form, we don't put a department created date field but actually we already create one in database table of department.


    phpMyAdmin

    In the database the structure of department_created_date is type of DATATIME .


    The time is automatically inserted by timer, not manually by user .

    This is the source code .

  • Installing Yii2 Advance Application Template + Xampp for Windows

    Installing Yii2 Advance Application Template + Xampp for Windows


    1. Open Xampp Control Panel 

    2. Change directory : cd htdocs

    3: Install using composer : composer create-project yiisoft/yii2-app-advanced advanced 2.0.9

    4. Change directory : cd advanced


    5. Yii Application Initialiazation : php init

    6. Choose Development : 0


    7. Php yii migration : php yiii migrate


  • Yii2 dengan Composer

    Yii2 dengan Composer

    This cmd is the place you should place those source code . I waste so much time paste at another place . ok .. LOL..

    1. Open xampp
    2. Click Shell


    Install via Composer

    If you do not have Composer, you may install it by following the instructions at getcomposer.org.
    You can then install this project template using the following command:
    php composer.phar global require "fxp/composer-asset-plugin:~1.1.1"
    php composer.phar create-project --prefer-dist --stability=dev yiisoft/yii2-app-basic basic
    
    Now you should be able to access the application through the following URL, assuming basic is the directory directly under the Web root.
    http://localhost/basic/web/
  • How I solved \cp_settings\cache.properties.lock (Access is denied) in Android Studio

    How I solved \cp_settings\cache.properties.lock (Access is denied) in Android Studio

    This error give a big problem for me because it will stop you from doing the project even to start it . This problem usually happen when you start to import another project from other resources. Figure 1 is before and Figure 2 is after.


    Figure 1


    Figure above show the original place the .gradle folder . My assumption is this cache.properties.lock (Access is denied) might happen because of the permission issue at User directory at local disk.

    Convenient method is to delete the cp_settings\cache.properties.lock file .  But the problem as we build the gradle in Android Studio project. The cache.properties.lock file will automatically rebuilt again.


    Hence what I did, is to change the .gradle place .


    Figure 2

    I change the .gradle to my own Workspace which mean in another folder out from User folder in local disk.If you are developing Android Studio project, I recommend to create new partition. This partition is for your development file, example SDK and other plugin . If you put in your local disk, you might have as your local disk become RED/Full .


    Next please open Android Studio :


    Figure 3

    In Figure 3, I show you where to open Default Setting in Android Studio . This is due we need to change .gradle directory setting. Click on Default Setting.


    Figure 4


    In Figure 4, is my original setting for .gradle directory . This directory need to be alter to your own place. 


    Figure 5

    In Figure 5, is my new setting for .gradle directory . Click OK and restart you Android Studio.

    I hope this will give you other solution to solve access denied permission in Android Studio .

     \cp_settings\cache.properties.lock (Access is denied) in Android Studio


  • Get It Now ! Microsoft Office Pro 2007 with Serial Key

    Get It Now ! Microsoft Office Pro 2007 with Serial Key

    This entry is link to My Drive . I know it will give big problem to student who don't have money to buy Microsoft Office original. Hence I glad to share something that will benefit poor people like us. I hope Bill Gates don't mind.


    Figure above show the place for serialkey of the software . After you download, open the folder and you will found the serialkeys.txt .

    To install the program the execute file name is Setup.

    Run the program Setup ..


    If you are really newbie, please ask someone else to help you .. If you are really really newbie and you are
    girl . Find me on Facebook..

    By the way, for the Web Expression Software, I might already corrupted . Sorry babe.


    This is my drive link -- >> Crack Software ZIP
  • How To Update Google Glass Driver (Connect To Window 7)

    How To Update Google Glass Driver (Connect To Window 7)


    After connecting the Google Glass to computer, you need to do few to make it enabled in  Android Studio. I write this Tutorial during I am doing some try and error, hence you might see I am not doing it in chronological method. Let’s Start.

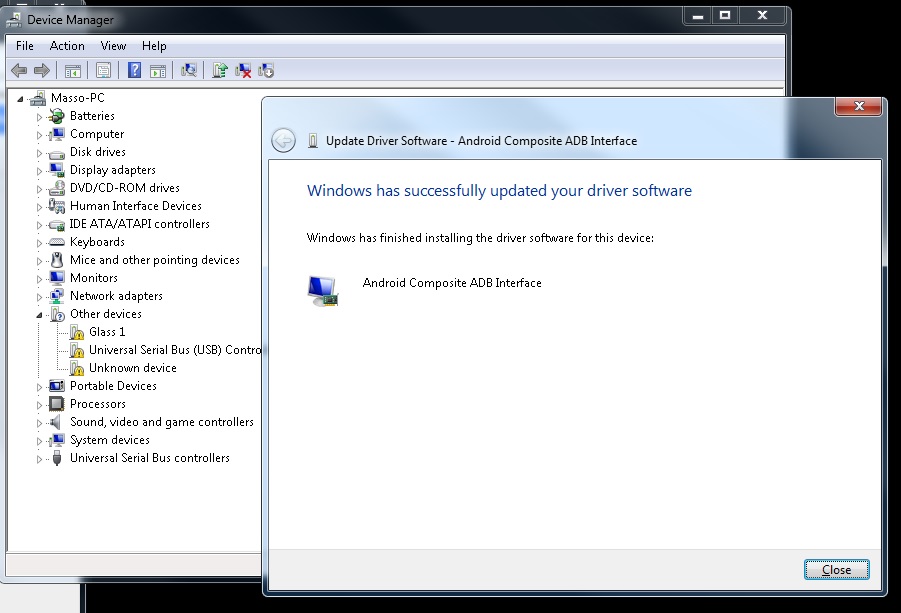
    Go to Start > Run > Device Manager

    Picture below show the list of devices attached in the device manager . If you see my Glass 1 show some caution which meaning need to update .

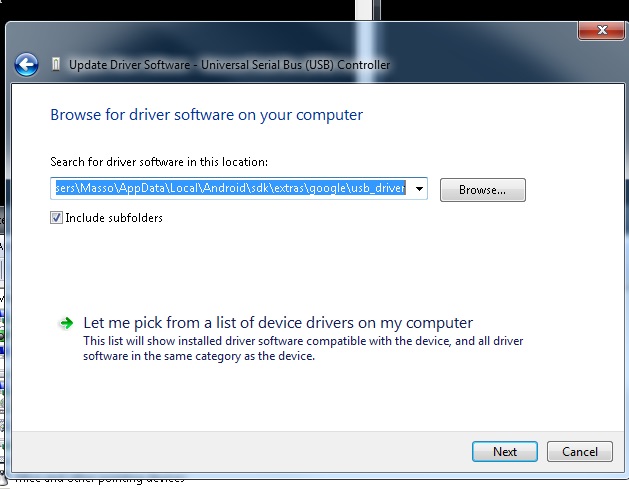
    The “Right Click” on the “Glass 1” device,” Update Driver  Software”. The you need to browse where is the driver location.

    We need to insert the directory of “Android/sdk/extras/google/usb_driver”


    Update Glass1 : Browse from computer
    “C:\Users\Masso\AppData\Local\Android\sdk\extras\google\usb_driver”


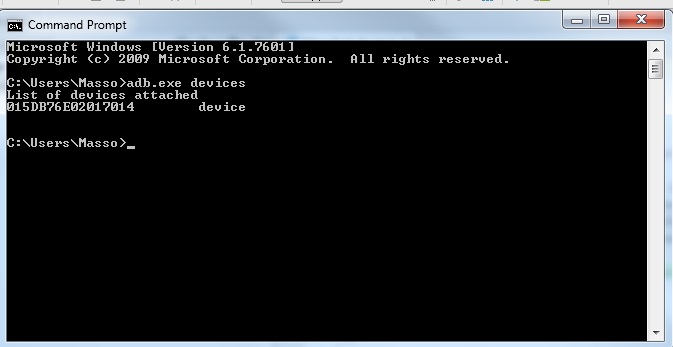
    Ok let see if we managed to update update driver or not with command prompt . If you having problem with the adb devices not recognized, please check your environment system.  

    Run CMD
    Insert --> “adb.exe devices”


    Because of the “android_winusb.inf” is not update yet. Hence the device is unauthorized.

    Then  I need to edit something.


    Copy this

    ;Google Glass
    %SingleAdbInterface% = USB_Install, USB\VID_18D1&PID_4E11&REV_0216
    %CompositeAdbInterface% = USB_Install, USB\VID_18D1&PID_4E11&MI_01

    %SingleAdbInterface% = USB_Install, USB\VID_18D1&PID_9001&REV_0216
    %CompositeAdbInterface% = USB_Install, USB\VID_18D1&PID_9001&MI_01

    to  these two sections:

    [Google.NTx86]

    [Google.NTamd64]


    After editing the “android_winusb.inf” at directory “Android/sdk/extras/google/usb_driver” the List of devices attached will show device not unauthorized anymore.


    If your Android Studio still not detecting the Google Glass this might because of your computer need a driver signature.


    To encounter the driver signature problem you need to reboot computer and go to Advanced Boot Options .
    Press F8 or any key to get into Advanced Boot Options

    Then ->
    Disable Driver Signature Enforcement


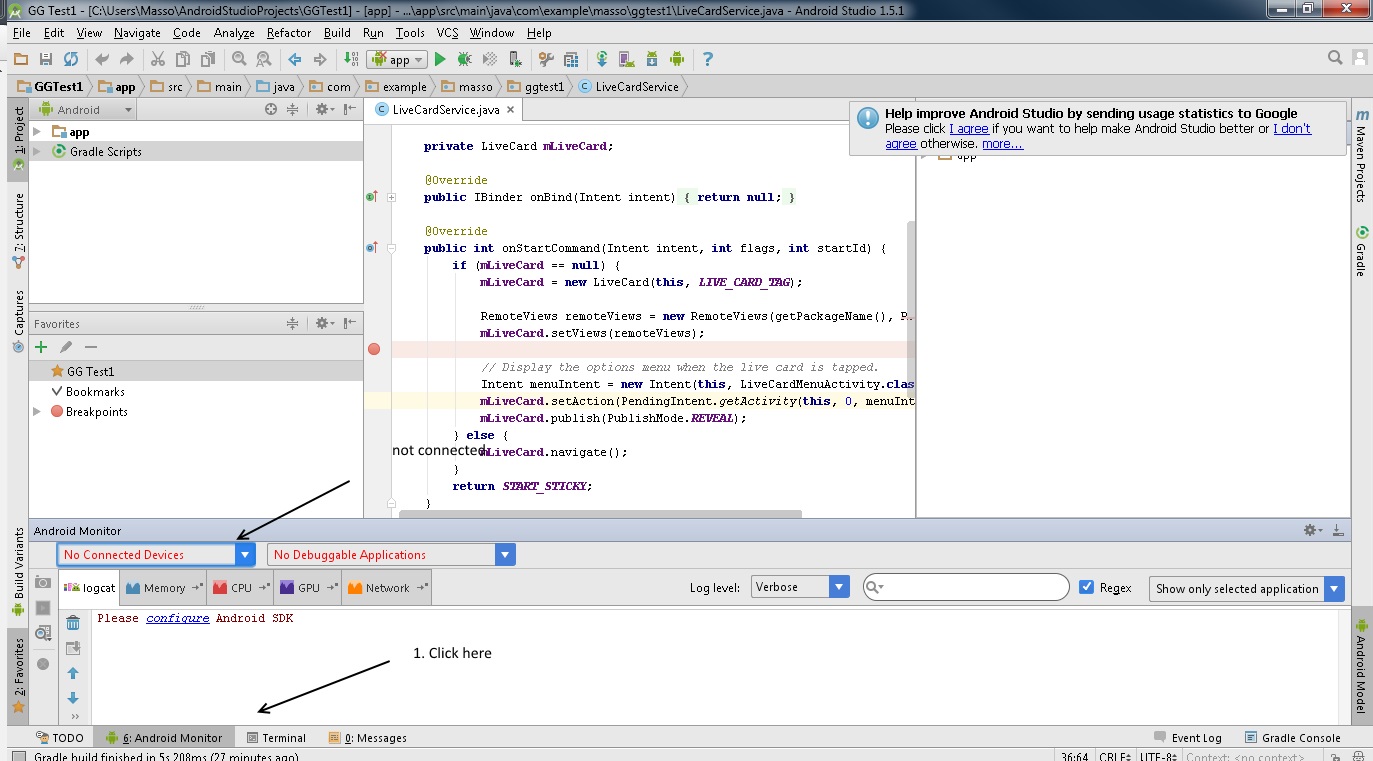
    Then connect the Google Glass device and open Android Studio .

    1. Connect device
    2. Turn on debugging mode in Google Glass
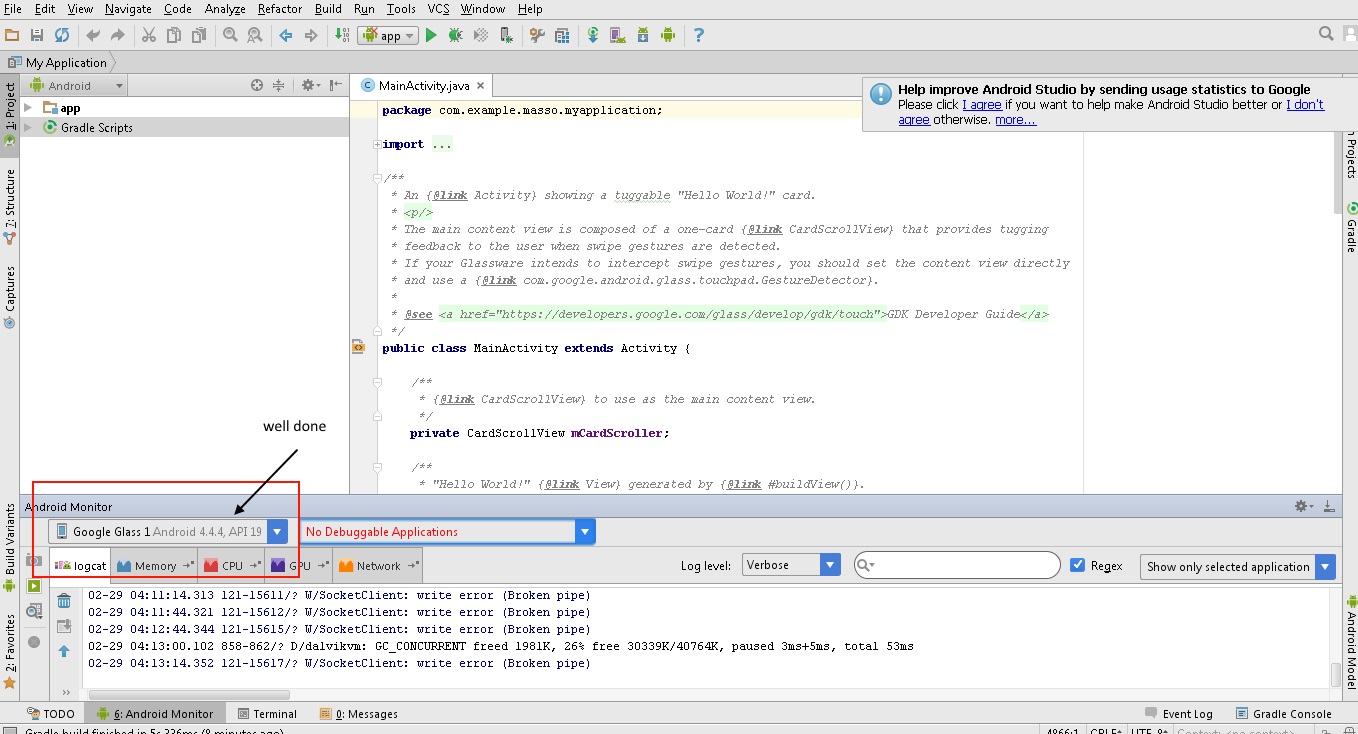
    3. Open Android Studio and go to Android Monitor usually at the bottom..


    How to Turn On debugging mode in Google Glass ?

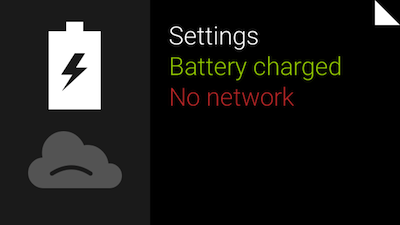
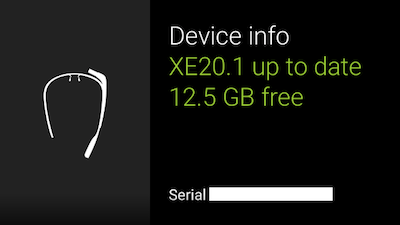
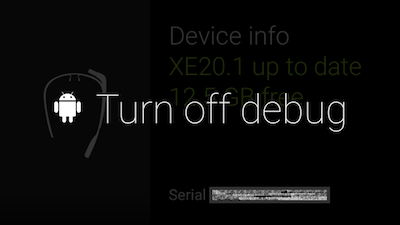
    You have to do something like this on every Android device you use for development of your apps so this might be familiar. To enable debug, swipe to “Settings” -> “Device info” and then tap to open device menu. Select “Turn on debug” and it will be enabled.

    toptal-blog-image-1410448653133.png

    toptal-blog-image-1410449025777.png


    toptal-blog-image-1410449059175.png


    Lastly if my entry not very clear to you, then you may visit
  • GET A FREE QUOTE NOW

    Lorem ipsum dolor sit amet, consectetuer adipiscing elit, sed diam nonummy nibh euismod tincidunt ut laoreet dolore magna aliquam erat volutpat.

    ADDRESS

    4759, NY 10011 Abia Martin Drive, Huston

    EMAIL

    contact-support@mail.com
    another@mail.com

    TELEPHONE

    +201 478 9800
    +501 478 9800

    MOBILE

    0177 7536213 44,
    017 775362 13